INTRODUCTION
GIS programs like Google Earth offer a lot of capabilities that can be exploited by various professional agencies. Access to overhead imagery, three dimensional environments, and the ability to edit and distribute information through the program make Google Earth in particular a useful analytical tool. One potential use for the program which seems to be underutilized is in the realm of law enforcement. While Google Earth is not a real-time imagery browser, a number of the capabilities it offers can enhance the performance of law enforcement functions.
This article represents a sanitized and reduced-scope version of a professional training tool developed by the author for a client in the Southwestern United States. It is intended to provide a basic overview of some of the capabilities of Google Earth valuable to law enforcement agencies and brief descriptions of how they can be effectively exploited.
AREA EXPLOITATION
One of the most obvious aspects of Google Earth that can be exploited is the ability to analyze the local environment. This can be of critical importance to any law enforcement agency planning surveillance or an offensive operation in a potentially unfamiliar area. While traditional maps and charts can offer a degree of understanding, Google Earth offers a far more robust set of features for extracting data.
Layout
The overhead nature of Google Earth provides an excellent medium for analyzing the layout of a given area, be it an urban, rural, or uninhabited location. Simply navigating to a point of interest provides the user with a significant amount of information. The status bar along the botom of the screen provides, from left to right, the date the imagery was acquired, the coordinates, the elevation, and the eye altitude.
The imagery capture date is significant as it allows the user to put the image in context. An older image may not show current features such as roads or buildings. Alternatively historical imagery can be browsed to view changes to the area that have been made over time.
The coordinates and elevation data are directly tied to the position of the on-screen cursor. As the cursor is moved around the screen, the coordinates and elevation data will change to account for the current position.
The eye altitude is the apparent position of the viewer above the image. For example, an eye altitude of 5,000 feet indicates that the image is what would be seen by an observer 5,000 feet above ground level.
Once an area of interest has been located, various features can be viewed by selecting different options in the Layers menu found at the bottom left of the screen. Some relevant features include roads, which will bring up the paths and names of various roads in an area, and other locations such as restaurants, bars, hospitals, water features, and terrain.
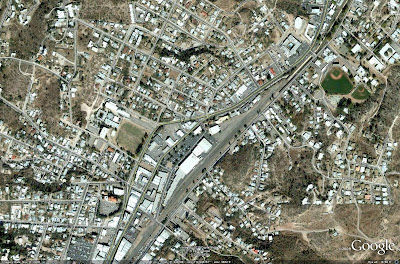
The following image depicts Nogales, Arizona, with the roads feature activated. Notice how both the pathways and names of the roads are overlaid on the overhead imagery.
 Examining Terrain
Google Earth provides many ways to view the environment in three dimensions. The most common involves viewing the terrain in a given area. By selecting the terrain feature in the Layers menu, three dimensional terrain is loaded into the image.
Terrain data can also be manipulated to exaggerate features, making them more apparent to the observer. In the Options menu, accessed through the Tools section of the taskbar at the top of the screen, a number from 0.5 to 3 can be entered for Elevation Exaggeration. The default value is 1, which displays terrain at the natural scale.
Once terrain features are activated, pressing and holding the mouse wheel will bring up a special cursor on the screen. Pulling back on the mouse will tilt the image allowing terrain to be viewed in 3D. Pushing forward will then return the image to its traditional overhead state.
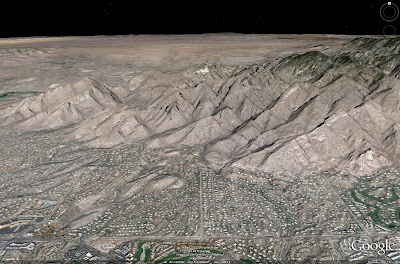
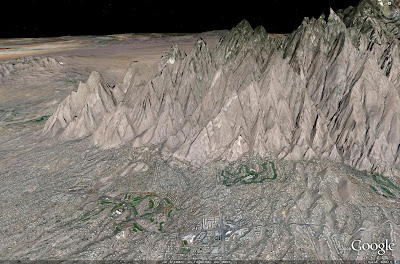
Consider the following two images, both depicting the terrain north of Tuscon, Arizona. Both images show the same approximate areas. The first image depicts the terrain with an elevation exaggeration value of 1, while the second image depicts the terrain with an elevation exaggeration value of 3. Notice how the features in the second image are greatly exaggerated to bring out their details.
 Cities in 3D
3D buildings are available for many major metropolitan areas in Google Earth. These buildings are available in two formats, basic greyscale shapes and photorealistic structures. Greyscale shapes approximate the basic shapes of the buildings they represent, while the photorealistic versions have digital photographs applied to their surfaces to provide a more realsitic approximation of the structures.
3D buildings are accessed in the Layers menu, with the option for loading either grayscale, photorealistic, or both types of buildings available. These structures are created by Google and its user community using a program called Google Sketchup. Buildings are submitted to Google for inclusion into the database, which ensures that the most accurate structures are incorporated and are properly aligned with the imagery. Users can also create their own structures and access them locally.
Phoenix, Arizona provides a suitable environment for examining both types of 3D structures available. In this case, as is the case with many locations, downtown Phoenix is primarily populated with photorealistic buildings, with the outlying areas relying primarily on greyscale structures.
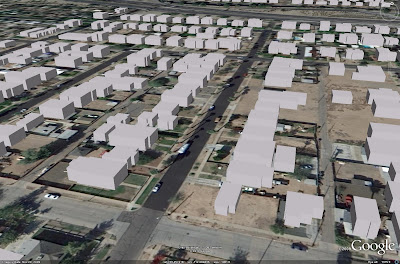
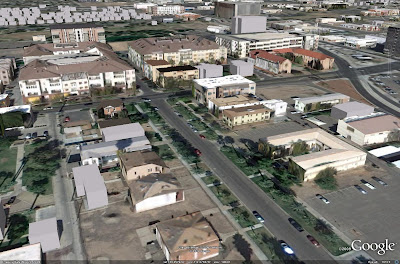
The image below illustrates a residential area northwest of downlown Phoenix. This area has been constructed using greyscale buildings.
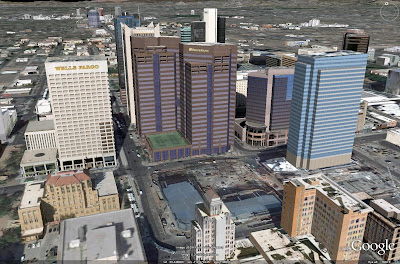
 The image below illustrates downtown Phoenix. The area has been rendered using photorealistic structures for added detail. Note how segments of the overhead imagery for Phoenix has been incorporated into the buildings for additional effect, including the imagery of a tennis court atop the lower level of the Ernst & Young complex.
 The following image depicts a location in Phoenix where both types of building can be seen.
 Uses
Uses
The various layout features of Google Earth lend themselves to a wide variety of law enforcemnt applications. Traditional activities such as foot or vehicle patrol routes can be planned to maximize the coverage available, ensuring that high interest areas are given the required amount of attention. Routes to and from locations of interest can be evaluated. By using the roads feature, any route can be properly planned, including those through areas or to locations which are not well known.
Apart from the basic features, having a three dimensional environment to exploit is a very useful tool. The most obvious advantage conferred by a three dimensional environment is the ability to evaluate fields of view from various positions. When planning an approach to a given location, for example, a three dimensional environment allows law enforcement officials to evaluate the most unobtrusive approach to a given location, taking the greatest advantage of surrounding structures or terrain. Likewise, in a situation where sniper support or some other form of overwatch is required, a three dimensional environment can be used to evaluate the most advantageous deployment locations for these assets, maximizing their fields of view of the area of interest with regard to other obstructions in the area.
Consider the following example. In this instance, assume that the point of interest is a location to which police must be dispatched to deal with a developing situation. In an encounter such as this, success is often related to the ability to arrive with enough stealth to apprehend most or all of the individuals involved. Having a three dimensional view of the environment can be a significant asset in planning the proper route of approach.
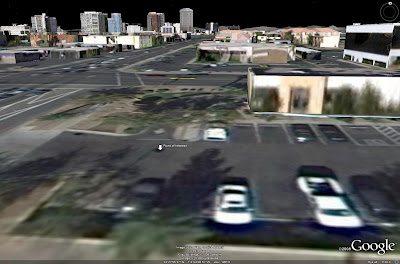
In the first image, it can clearly be seen that a direct approach from the north is undesirable. The parking lot of the building across the street provides a clear field of view from the POI to identify any approaching units.
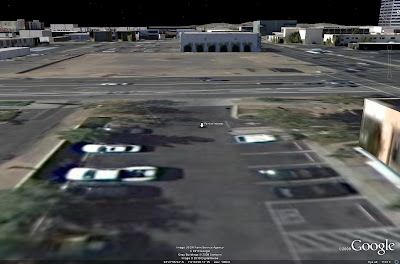
 Likewise, an approach from the west may not be desirable. The following image illustrates that even with the building across the street to the west from the POI, the main street leading to the intersection can be monitored to a degree.
 Approaching from the east and taking a less direct route can afford the greatest element of suprise. The building directly adjacent to the POI, combined with the large structures across the street to the northeast, can be used to mask the majority of any approach, as seen in the image below.
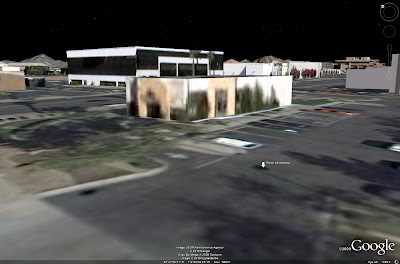 In this case, the route of approach can be seen in an overhead view in the image below.
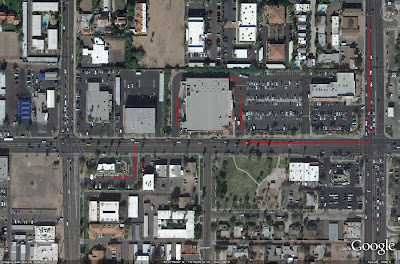 Other routes can certainly prove as or more effective, particularly from the south, but this example illustrates how a three dimensional environment can be significantly useful in developing effective strategies.
The eye altitude information can be exploited to enhance helicopter support for organizations possessing these assets. Recall that the eye altitude represents the position of the observer above the image. This data can be used to set altitudes for helicopter assets to ensure that they are able to effectively monitor a given area. Attention should be given to the calibration of the altimeters in the helicopters. Most altimeters are calibrated to sea level. In this case, the correct altitude would be a combination of the eye altitude and the elevation. If the desired eye altitude is 5,000 feet and the local elevation is 1,000 feet, then the distance above sea level of the patrol should be reported as an altitude of 6,000 feet.
DATA INCORPORATION
Having a tool such as Google Earth to evaluate the layout of a given location can certainly enhance law enforcement activities, but where Google Earth becomes truly valuable is when user-generated data is incorporated into the program. This allows for a host of data analysis techniques to be applied. Data is entered into Google Earth using various annotations which can appear on-screen. These include placemarks, paths, polygon shapes, and external images.
Placemarks
The most effective way to incorporate data into Google Earth is by developing a set of placemarks. Placemarks appear on-screen and can be configured to display relevant details when clicked, providing a useful distribution medium for this information. It is important to develop an effective method of cataloging and detailing placemark files to ensure that they provide clear, concise information.
The following image depicts a portion of Phoenix displaying various placemarks denoting law enforcement activity. In this example, three different placemarks have been used. The blue vehicle denotes action by a patrol car, the orange silhouette denotes action by an office on foot, and the red triangle denotes hostile activity.
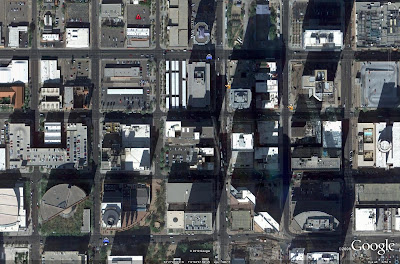 When clicked, each placemark will bring up a window such as the one seen in the image below.
 In this case, the placemark has been filled with data according to the following template:
Activity
Arresting Officer (AO)
Date
Time
Location
Details
Report
This allows any user to access the relevant data about the incident in question noted by the palcemark. There is also a location to incorporate a weblink to any relevant paperwork or reporting on the incident, allowing it to be quickly accessed.
The formatting and content of the information on display can be managed locally but should always employ the same basic template for ease of use. In this example, clicking on any of the placemarks in the image above would result in the same window being displayed, the only difference being in the information contained therein.
To add information to a placemark, one simply edits the Edit Placemark box which is displayed when a placemark is first added to Google Earth. To edit the placemark after it is entered, simply right click on it and select Properties to bring up the same Edit Placemark box.
The previous examples were generated by simply copying and pasting the basic template into the dialog box and filling in the relevant details. To unclutter the screen, the placemark labels have their opacity set to zero in the Edit Placemark dialog box. This hides any text and only displays the icons. It does not affect the displaying of the relevant data when the placemarks are clicked in Google Earth. Leaving the label opacity set to the default of 100% will result in the placemark name being displayed adjacent to the placemark. When a large number of placemarks are displayed on-screen, this can make for a very cluttered environment.
It should be noted that the dialog box is HTML compatible, allowing the text to be highlighted or otherwise edited. However, due to this fact it is necessary to incorporate "br" following each line of text to denote a break or to simulate hitting the return key. The quotation marks should be replaced with < or > on either side of the "br", but this cannot be effectively shown here due to formatting restrictions.
If desired, there are resources available which can be used to develop a unique set of placemarks if those found in Google Earth do not represent the best method of display.
Placemarks can be organized using the My Places section of the Places menu at the left of the screen. By right clicking on My Places, Add Folder can be selected, allowing the user to add a named folder to store placemarks. Likewise, subfolders can be added for further organization. In this case, the placemarks have been stored in a folder titled Precinct 117, in a subfolder for Arrests. This subfolder is then divided into July and August 2010 subfolders. By selecting or deselecting various fodlers and subfolders, the user can manipulate the data he or she wishes to display and evaluate.
Placemarks can be further enhanced by incorporating images. In this case, an image is added by incorporating a web or network link to the relevant image. This feature can be used to provide images of activity, evidence, or other information of relevance. Images can be added to any placemark using the following HTML text: img src="XXX" /img The XXX inside of the quote marks is replaced with the network or web link to the image. Both img src="XXX" and /img are contained within the < and > brackets, which again cannot be fully shown here. In the following image, the dialog box displayed has a picture added.
 Images should be stored locally on a shared fileserver if possible. This allows users to use the same basic file path to locate images, removing some of the difficulty involved.
Paths and Polygons
Paths and polygons can also be effective tools. They are added using the path or polygon tools at the top of the screen. In a polygon, clicking on the screen will place a corner, and in a path, clicking on the screen will drop a point along the route. Polygons can be filled or outlined, and both features can have their colors, width, and other features edited. Also, both features have dialog boxes which can be edited using the same method as that found in the placemarks. Clicking on any point along the path or polygon will result in the dialog box being displayed.
The image below denotes a use for the path feature. In this example two paths are denoted. The green path denotes a patrol route for a patrol car, with the blue path denoting a patrol route for an officer on foot.
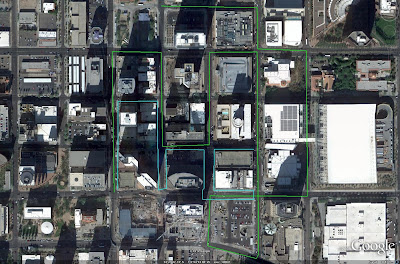 The image below denotes a use for the polygon feature. In this example different colored polygons are being used to denote different gang turfs.
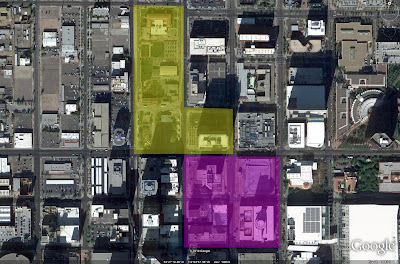 A placemark database can be saved by selecting the most upper-level folder, which in this case would be Precinct 117, right clicking, and selecting Save As. This will save placemarks as well as any other features such as paths or polygons that are present. Alternatively, Google Earth saves the same files in the My Places directory upon exit. When exiting Google Earth, the Server Log Out option under the File menu in the menu bar should be selected first. This ensures that the placemark data is saved without loss of data. At times Google Earth can fail to save recently entered data if the program is simply exited.
Network Links
One way of effectively sharing placemark data, and ensuring that it is entered consistently using a prescribed format, is to manage the files on one computer. The placemark files would then be shared to other users using a network link. In this case, it is necessary to manage the placemark files as a separate dataset, loading the files into Google Earth when editing or data entry is required.
In this method, the user would load a placemark dataset into Google Earth by clicking Control-O and selecting the dataset from a shared network drive or internet source. Any editing is then done, before the dataset is re-saved to the previous location. To access the information, a network link is generated. This is done by selecting Add Network Link from the Add menu in the menu bar at the top of the screen. In the dialog box that appears, the pathway to the file is included in the Link box. This network link can then be saved independently and shared to various users via email or by posting it to an intranet or shared server. When the users open the network link, they will immediately have access to the dataset.
ANALYTICAL USES
While it can take a considerable amount of time to initially generate a dataset, once it has been generated and proper procedures have been developed for incorporating new data it can prove to be a very useful analytical tool.
Many of the previously mentioned law enforcement functions can be significantly enhanced by employing a robust dataset in Google Earth. For example, simply marking and tracking the locations of arrests or crimes can be used to adjust patrol routes to ensure that they pass through areas with a significant amount of activity. In this instance, proper use of Google Earth and a developed dataset can eventually serve as a deterrent to criminal activity.
Likewise, a developed dataset can allow a law enforcement organization to properly allocate resources in a region, ensuring that high-crime areas have the necessary resources to adequately serve the public. This is a prime example of the financial benefit of geospatial information technology.
Counterdrug Operations
One aspect of law enforcement where GIS technologies such as Google Earth can be effective is in counterdrug operations. Using the aforementioned techniques, locations of drug-related arrests or locations of drug-related points of entry or facilities can be tracked.
Consider the following image. Assuming that the marked locations are distribution points of drugs entering the United States from Mexico, a host of analytical options can be described.
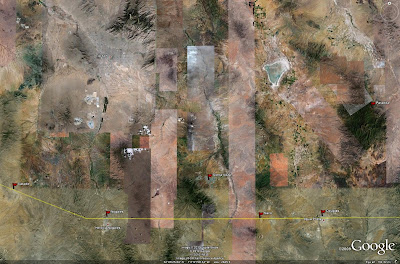 Once locations are known and marked, various options are available for analysis. The most obvious involves discerning potential routes of travel for distribution. Simple analysis can be performed, asking questions such as "do they travel at night" or "are they using heavy or light vehicles". Knowing when and how drugs are being transported can serve to more accurately identify potential routes of travel. Light vehicles may be more likely to make use of minor or even unpaved roadways in a given region, which are often patrolled far less frequently. Being able to exploit a gods-eye view of the area can often help to make such analytical decisions easier to understand.
Furthermore, being able to visually observe drug-related activity in a program such as Google Earth can aid in the identification of distribution facilities or production centers. When a number of drug-related arrests, particularly those involving the sale of controlled substances, are marked in a given area, analysis can be performed on the dataset to identify likely distribution centers. One such method can be to determine the facilities relatively equidistant from each arrest, and marking them for further investigation. Other intelligence sources can also be used in combination with the available data to effectively analyze the overall picture in a given area or region.
Gang Activity
Gang activity can also be evaluated using Google Earth. A previous image depicted two notional gang territories in Phoenix. Simply marking such regions can be a useful endeavor. Areas where two or more territories abut against one another can be potentially volatile regions. A logical use for this data would be to manage patrols in the area to forestall any violent action to a degree.
Territories themselves can be evaluated and marked using analysis of gang symbology in a region. A previous example depicted an image of gang symbology inserted into the dialog box associated with a placemark. Marking these occurrences in Google Earth can serve as a way of identifying the breadth of a particular gang's territory. Furthermore, an officer or agent assigned to a particular area can exploit such a placemark as a reference source on the potential symbology associated with a region. Then, if a different set of symbology is discovered, gang territories can be updated accordingly. This can aid in the understanding of the fluidity of territories in some areas.
Border Security
One of the most critical problems facing law enforcement agencies in some areas is border security. A three dimensional viewer such as Google Earth can be an effective tool in evaluating and combating border incursions.
Having three dimensional terrain to evlauate can often provide insight into potential routes of ingress by illegal aliens. Being able to visualize the terrain in a region can aid law enforcement agencies in discerning how illegals manage to cross the border unobserved. Often, terrain can be exploited by these criminal groups to mask their presence from population centers in a given region. The analyst need simply ask the question "where can they be hidden from view" to discover potential ingress routes which may not have been apparent simply by examining a two dimensional map of the area.
Such analysis can also aid in other areas, such as discovering border crossing zones where illegal substances are brought into the nation. While these techniques alone will not necessarily identify these areas conclusively, they can certainly aid in developing a starting point for any investigation.
CONCLUSION
Google Earth by itself is not going to put an end to crime in America. Nor should it be used as the sole source or method for performing analysis and evaluating potential courses of action by any law enforcement agency. However, it can clearly be seen that effective analysis coupled with a robust set of data to evaluate can most definitely have benefits to any law enforcement agency. Law enforcement agencies would certainly benefit from proper exploitation of this freely available resource.
SOURCES
-Satellite imagery provided courtesy of Google Earth
GIS programs like Google Earth offer a lot of capabilities that can be exploited by various professional agencies. Access to overhead imagery, three dimensional environments, and the ability to edit and distribute information through the program make Google Earth in particular a useful analytical tool. One potential use for the program which seems to be underutilized is in the realm of law enforcement. While Google Earth is not a real-time imagery browser, a number of the capabilities it offers can enhance the performance of law enforcement functions.
This article represents a sanitized and reduced-scope version of a professional training tool developed by the author for a client in the Southwestern United States. It is intended to provide a basic overview of some of the capabilities of Google Earth valuable to law enforcement agencies and brief descriptions of how they can be effectively exploited.
AREA EXPLOITATION
One of the most obvious aspects of Google Earth that can be exploited is the ability to analyze the local environment. This can be of critical importance to any law enforcement agency planning surveillance or an offensive operation in a potentially unfamiliar area. While traditional maps and charts can offer a degree of understanding, Google Earth offers a far more robust set of features for extracting data.
Layout
The overhead nature of Google Earth provides an excellent medium for analyzing the layout of a given area, be it an urban, rural, or uninhabited location. Simply navigating to a point of interest provides the user with a significant amount of information. The status bar along the botom of the screen provides, from left to right, the date the imagery was acquired, the coordinates, the elevation, and the eye altitude.
The imagery capture date is significant as it allows the user to put the image in context. An older image may not show current features such as roads or buildings. Alternatively historical imagery can be browsed to view changes to the area that have been made over time.
The coordinates and elevation data are directly tied to the position of the on-screen cursor. As the cursor is moved around the screen, the coordinates and elevation data will change to account for the current position.
The eye altitude is the apparent position of the viewer above the image. For example, an eye altitude of 5,000 feet indicates that the image is what would be seen by an observer 5,000 feet above ground level.
Once an area of interest has been located, various features can be viewed by selecting different options in the Layers menu found at the bottom left of the screen. Some relevant features include roads, which will bring up the paths and names of various roads in an area, and other locations such as restaurants, bars, hospitals, water features, and terrain.
The following image depicts Nogales, Arizona, with the roads feature activated. Notice how both the pathways and names of the roads are overlaid on the overhead imagery.
 Examining Terrain
Google Earth provides many ways to view the environment in three dimensions. The most common involves viewing the terrain in a given area. By selecting the terrain feature in the Layers menu, three dimensional terrain is loaded into the image.
Terrain data can also be manipulated to exaggerate features, making them more apparent to the observer. In the Options menu, accessed through the Tools section of the taskbar at the top of the screen, a number from 0.5 to 3 can be entered for Elevation Exaggeration. The default value is 1, which displays terrain at the natural scale.
Once terrain features are activated, pressing and holding the mouse wheel will bring up a special cursor on the screen. Pulling back on the mouse will tilt the image allowing terrain to be viewed in 3D. Pushing forward will then return the image to its traditional overhead state.
Consider the following two images, both depicting the terrain north of Tuscon, Arizona. Both images show the same approximate areas. The first image depicts the terrain with an elevation exaggeration value of 1, while the second image depicts the terrain with an elevation exaggeration value of 3. Notice how the features in the second image are greatly exaggerated to bring out their details.

 Cities in 3D
3D buildings are available for many major metropolitan areas in Google Earth. These buildings are available in two formats, basic greyscale shapes and photorealistic structures. Greyscale shapes approximate the basic shapes of the buildings they represent, while the photorealistic versions have digital photographs applied to their surfaces to provide a more realsitic approximation of the structures.
3D buildings are accessed in the Layers menu, with the option for loading either grayscale, photorealistic, or both types of buildings available. These structures are created by Google and its user community using a program called Google Sketchup. Buildings are submitted to Google for inclusion into the database, which ensures that the most accurate structures are incorporated and are properly aligned with the imagery. Users can also create their own structures and access them locally.
Phoenix, Arizona provides a suitable environment for examining both types of 3D structures available. In this case, as is the case with many locations, downtown Phoenix is primarily populated with photorealistic buildings, with the outlying areas relying primarily on greyscale structures.
The image below illustrates a residential area northwest of downlown Phoenix. This area has been constructed using greyscale buildings.
 The image below illustrates downtown Phoenix. The area has been rendered using photorealistic structures for added detail. Note how segments of the overhead imagery for Phoenix has been incorporated into the buildings for additional effect, including the imagery of a tennis court atop the lower level of the Ernst & Young complex.
 The following image depicts a location in Phoenix where both types of building can be seen.
 Uses
UsesThe various layout features of Google Earth lend themselves to a wide variety of law enforcemnt applications. Traditional activities such as foot or vehicle patrol routes can be planned to maximize the coverage available, ensuring that high interest areas are given the required amount of attention. Routes to and from locations of interest can be evaluated. By using the roads feature, any route can be properly planned, including those through areas or to locations which are not well known.
Apart from the basic features, having a three dimensional environment to exploit is a very useful tool. The most obvious advantage conferred by a three dimensional environment is the ability to evaluate fields of view from various positions. When planning an approach to a given location, for example, a three dimensional environment allows law enforcement officials to evaluate the most unobtrusive approach to a given location, taking the greatest advantage of surrounding structures or terrain. Likewise, in a situation where sniper support or some other form of overwatch is required, a three dimensional environment can be used to evaluate the most advantageous deployment locations for these assets, maximizing their fields of view of the area of interest with regard to other obstructions in the area.
Consider the following example. In this instance, assume that the point of interest is a location to which police must be dispatched to deal with a developing situation. In an encounter such as this, success is often related to the ability to arrive with enough stealth to apprehend most or all of the individuals involved. Having a three dimensional view of the environment can be a significant asset in planning the proper route of approach.
In the first image, it can clearly be seen that a direct approach from the north is undesirable. The parking lot of the building across the street provides a clear field of view from the POI to identify any approaching units.
 Likewise, an approach from the west may not be desirable. The following image illustrates that even with the building across the street to the west from the POI, the main street leading to the intersection can be monitored to a degree.
 Approaching from the east and taking a less direct route can afford the greatest element of suprise. The building directly adjacent to the POI, combined with the large structures across the street to the northeast, can be used to mask the majority of any approach, as seen in the image below.
 In this case, the route of approach can be seen in an overhead view in the image below.
 Other routes can certainly prove as or more effective, particularly from the south, but this example illustrates how a three dimensional environment can be significantly useful in developing effective strategies.
The eye altitude information can be exploited to enhance helicopter support for organizations possessing these assets. Recall that the eye altitude represents the position of the observer above the image. This data can be used to set altitudes for helicopter assets to ensure that they are able to effectively monitor a given area. Attention should be given to the calibration of the altimeters in the helicopters. Most altimeters are calibrated to sea level. In this case, the correct altitude would be a combination of the eye altitude and the elevation. If the desired eye altitude is 5,000 feet and the local elevation is 1,000 feet, then the distance above sea level of the patrol should be reported as an altitude of 6,000 feet.
DATA INCORPORATION
Having a tool such as Google Earth to evaluate the layout of a given location can certainly enhance law enforcement activities, but where Google Earth becomes truly valuable is when user-generated data is incorporated into the program. This allows for a host of data analysis techniques to be applied. Data is entered into Google Earth using various annotations which can appear on-screen. These include placemarks, paths, polygon shapes, and external images.
Placemarks
The most effective way to incorporate data into Google Earth is by developing a set of placemarks. Placemarks appear on-screen and can be configured to display relevant details when clicked, providing a useful distribution medium for this information. It is important to develop an effective method of cataloging and detailing placemark files to ensure that they provide clear, concise information.
The following image depicts a portion of Phoenix displaying various placemarks denoting law enforcement activity. In this example, three different placemarks have been used. The blue vehicle denotes action by a patrol car, the orange silhouette denotes action by an office on foot, and the red triangle denotes hostile activity.
 When clicked, each placemark will bring up a window such as the one seen in the image below.
  In this case, the placemark has been filled with data according to the following template:
Activity
Arresting Officer (AO)
Date
Time
Location
Details
Report
This allows any user to access the relevant data about the incident in question noted by the palcemark. There is also a location to incorporate a weblink to any relevant paperwork or reporting on the incident, allowing it to be quickly accessed.
The formatting and content of the information on display can be managed locally but should always employ the same basic template for ease of use. In this example, clicking on any of the placemarks in the image above would result in the same window being displayed, the only difference being in the information contained therein.
To add information to a placemark, one simply edits the Edit Placemark box which is displayed when a placemark is first added to Google Earth. To edit the placemark after it is entered, simply right click on it and select Properties to bring up the same Edit Placemark box.
The previous examples were generated by simply copying and pasting the basic template into the dialog box and filling in the relevant details. To unclutter the screen, the placemark labels have their opacity set to zero in the Edit Placemark dialog box. This hides any text and only displays the icons. It does not affect the displaying of the relevant data when the placemarks are clicked in Google Earth. Leaving the label opacity set to the default of 100% will result in the placemark name being displayed adjacent to the placemark. When a large number of placemarks are displayed on-screen, this can make for a very cluttered environment.
It should be noted that the dialog box is HTML compatible, allowing the text to be highlighted or otherwise edited. However, due to this fact it is necessary to incorporate "br" following each line of text to denote a break or to simulate hitting the return key. The quotation marks should be replaced with < or > on either side of the "br", but this cannot be effectively shown here due to formatting restrictions.
If desired, there are resources available which can be used to develop a unique set of placemarks if those found in Google Earth do not represent the best method of display.
Placemarks can be organized using the My Places section of the Places menu at the left of the screen. By right clicking on My Places, Add Folder can be selected, allowing the user to add a named folder to store placemarks. Likewise, subfolders can be added for further organization. In this case, the placemarks have been stored in a folder titled Precinct 117, in a subfolder for Arrests. This subfolder is then divided into July and August 2010 subfolders. By selecting or deselecting various fodlers and subfolders, the user can manipulate the data he or she wishes to display and evaluate.
Placemarks can be further enhanced by incorporating images. In this case, an image is added by incorporating a web or network link to the relevant image. This feature can be used to provide images of activity, evidence, or other information of relevance. Images can be added to any placemark using the following HTML text: img src="XXX" /img The XXX inside of the quote marks is replaced with the network or web link to the image. Both img src="XXX" and /img are contained within the < and > brackets, which again cannot be fully shown here. In the following image, the dialog box displayed has a picture added.
 Images should be stored locally on a shared fileserver if possible. This allows users to use the same basic file path to locate images, removing some of the difficulty involved.
Paths and Polygons
Paths and polygons can also be effective tools. They are added using the path or polygon tools at the top of the screen. In a polygon, clicking on the screen will place a corner, and in a path, clicking on the screen will drop a point along the route. Polygons can be filled or outlined, and both features can have their colors, width, and other features edited. Also, both features have dialog boxes which can be edited using the same method as that found in the placemarks. Clicking on any point along the path or polygon will result in the dialog box being displayed.
The image below denotes a use for the path feature. In this example two paths are denoted. The green path denotes a patrol route for a patrol car, with the blue path denoting a patrol route for an officer on foot.
 The image below denotes a use for the polygon feature. In this example different colored polygons are being used to denote different gang turfs.
 A placemark database can be saved by selecting the most upper-level folder, which in this case would be Precinct 117, right clicking, and selecting Save As. This will save placemarks as well as any other features such as paths or polygons that are present. Alternatively, Google Earth saves the same files in the My Places directory upon exit. When exiting Google Earth, the Server Log Out option under the File menu in the menu bar should be selected first. This ensures that the placemark data is saved without loss of data. At times Google Earth can fail to save recently entered data if the program is simply exited.
Network Links
One way of effectively sharing placemark data, and ensuring that it is entered consistently using a prescribed format, is to manage the files on one computer. The placemark files would then be shared to other users using a network link. In this case, it is necessary to manage the placemark files as a separate dataset, loading the files into Google Earth when editing or data entry is required.
In this method, the user would load a placemark dataset into Google Earth by clicking Control-O and selecting the dataset from a shared network drive or internet source. Any editing is then done, before the dataset is re-saved to the previous location. To access the information, a network link is generated. This is done by selecting Add Network Link from the Add menu in the menu bar at the top of the screen. In the dialog box that appears, the pathway to the file is included in the Link box. This network link can then be saved independently and shared to various users via email or by posting it to an intranet or shared server. When the users open the network link, they will immediately have access to the dataset.
ANALYTICAL USES
While it can take a considerable amount of time to initially generate a dataset, once it has been generated and proper procedures have been developed for incorporating new data it can prove to be a very useful analytical tool.
Many of the previously mentioned law enforcement functions can be significantly enhanced by employing a robust dataset in Google Earth. For example, simply marking and tracking the locations of arrests or crimes can be used to adjust patrol routes to ensure that they pass through areas with a significant amount of activity. In this instance, proper use of Google Earth and a developed dataset can eventually serve as a deterrent to criminal activity.
Likewise, a developed dataset can allow a law enforcement organization to properly allocate resources in a region, ensuring that high-crime areas have the necessary resources to adequately serve the public. This is a prime example of the financial benefit of geospatial information technology.
Counterdrug Operations
One aspect of law enforcement where GIS technologies such as Google Earth can be effective is in counterdrug operations. Using the aforementioned techniques, locations of drug-related arrests or locations of drug-related points of entry or facilities can be tracked.
Consider the following image. Assuming that the marked locations are distribution points of drugs entering the United States from Mexico, a host of analytical options can be described.
 Once locations are known and marked, various options are available for analysis. The most obvious involves discerning potential routes of travel for distribution. Simple analysis can be performed, asking questions such as "do they travel at night" or "are they using heavy or light vehicles". Knowing when and how drugs are being transported can serve to more accurately identify potential routes of travel. Light vehicles may be more likely to make use of minor or even unpaved roadways in a given region, which are often patrolled far less frequently. Being able to exploit a gods-eye view of the area can often help to make such analytical decisions easier to understand.
Furthermore, being able to visually observe drug-related activity in a program such as Google Earth can aid in the identification of distribution facilities or production centers. When a number of drug-related arrests, particularly those involving the sale of controlled substances, are marked in a given area, analysis can be performed on the dataset to identify likely distribution centers. One such method can be to determine the facilities relatively equidistant from each arrest, and marking them for further investigation. Other intelligence sources can also be used in combination with the available data to effectively analyze the overall picture in a given area or region.
Gang Activity
Gang activity can also be evaluated using Google Earth. A previous image depicted two notional gang territories in Phoenix. Simply marking such regions can be a useful endeavor. Areas where two or more territories abut against one another can be potentially volatile regions. A logical use for this data would be to manage patrols in the area to forestall any violent action to a degree.
Territories themselves can be evaluated and marked using analysis of gang symbology in a region. A previous example depicted an image of gang symbology inserted into the dialog box associated with a placemark. Marking these occurrences in Google Earth can serve as a way of identifying the breadth of a particular gang's territory. Furthermore, an officer or agent assigned to a particular area can exploit such a placemark as a reference source on the potential symbology associated with a region. Then, if a different set of symbology is discovered, gang territories can be updated accordingly. This can aid in the understanding of the fluidity of territories in some areas.
Border Security
One of the most critical problems facing law enforcement agencies in some areas is border security. A three dimensional viewer such as Google Earth can be an effective tool in evaluating and combating border incursions.
Having three dimensional terrain to evlauate can often provide insight into potential routes of ingress by illegal aliens. Being able to visualize the terrain in a region can aid law enforcement agencies in discerning how illegals manage to cross the border unobserved. Often, terrain can be exploited by these criminal groups to mask their presence from population centers in a given region. The analyst need simply ask the question "where can they be hidden from view" to discover potential ingress routes which may not have been apparent simply by examining a two dimensional map of the area.
Such analysis can also aid in other areas, such as discovering border crossing zones where illegal substances are brought into the nation. While these techniques alone will not necessarily identify these areas conclusively, they can certainly aid in developing a starting point for any investigation.
CONCLUSION
Google Earth by itself is not going to put an end to crime in America. Nor should it be used as the sole source or method for performing analysis and evaluating potential courses of action by any law enforcement agency. However, it can clearly be seen that effective analysis coupled with a robust set of data to evaluate can most definitely have benefits to any law enforcement agency. Law enforcement agencies would certainly benefit from proper exploitation of this freely available resource.
SOURCES
-Satellite imagery provided courtesy of Google Earth

6 comments:
I totally agree with you . Google earth is a perfect analysis tool. I really enjoy using PATH or Polygon feartures in Google earth , but i wonder how you can make a circulur Path arround EW Sites (3d6D sites), because i do not know how ... I know that their is many Internet sites that draw a circular Path with specified Raduis , just if you provide those sites with center point accordinates ... whatever, Is their any software that can draw paths.
--- Best Regards ----
--- Omar Hanandeh ---
--- omarha@yahoo.com--
A very interesting discussion, thanks.
Question: Is there any way for an interested party, say a law enforcement office, to pay Google Earth to put up the most recent (or historical)imagery on GE?
I use a tool called the KML Circle Generator. I forget where it came from. It lets you add coordinates for the center point and a value for the radius, and generates you a circle by interfacing with the Polygon tool somehow.
While you can't pay GE to add to their imagery database, you can buy the imagery yourself and add it locally. You can add either an image, or a map or drawing as an overlay.
Anyone attempting to exploit GE imagery for scenario planning, situational awareness, or operational activity should bear in mind the significant vintage of the data. Google likes to claim that 'most' of its imagery is between 1 and 3 years old, but in practice much of what it makes available is older than 3 years. If your organization can't afford to license access to recent imagery, you'd be far better off using the Bing Maps cloud, where everything has a sub-2-year refresh, and a fairly extensive oblique collection is available to the public that covers most urban areas.
Hi Sean,
I'm a member of the Google Earth Team. I stumbled onto your blog post - wow, what great and detailed information! This would make a great example of an interesting way to use Google Earth. Do you mind if we showcase a piece of your post, for example the section on approaching a POI? You can paste the best part to submit here: https://earth.google.com/support/bin/request.py?contact_type=story
Thanks for such an interesting read!
Carolyn, Google Earth Team
Im from an Political Party in Argentina, we have developed a voluntary crime map using google database: www.mapadelainseguridad.com
Post a Comment