INTRODUCTION
I am often asked about the time and effort it takes to peruse through Google Earth's high resolution imagery to locate various items, most often SAM sites, of which I have catalogued over 1400. Locating military installations and other interesting objects can be a time consuming endeavor, but it can be made far easier with a few simple techniques. In this article I will share some of those techniques which have served me well in the past, with the hope that your experience viewing imagery through such sources as Google Earth will be that much more enjoyable and interesting.
COMPUTER SETTINGS
To begin, we will exmamine some of the basic computer settings that are helpful in examining imagery. My monitor is a widescreen display with a resolution of 1920 x 1200 pixels. Setting your screen to the maximum resolution is helpful when viewing imagery sources as it aids in bringing out some of the fine detail that can be seen. Inside the Google Earth options menu, set the Detail Area to the maximum setting of 1024 x 1024. Even with a widescreen monitor, with the Placemark and Layer tabs expanded on the left of the screen the entire imagery display will then display eitirely in full detail, without any of the areas surrounding the very center of the image being blurred. This will greatly aid in examining what you see before you on your monitor.
BEGINNING EXAMINATION
In the bottom right of the imagery display area in Google Earth, you will notice a label called "Eye alt", followed by a series of numbers and an abbreviation. What these numbers are telling you is the alttude, in either feet or miles, that you are viewing the image from. I have found that the optimal viewing altitude for quick perusal of a given area is 15,000 feet.
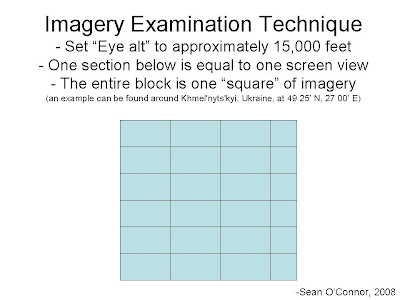
When imagery is added into Google Earth, it is usually in the form of strips of either satellite or aerial imagery. These strips are in reality collections of square-shaped images that have been combined together into a mosaic. With my monitor settings, each individual square can be broken up into six rows, with each row being approximately three and a half screens across. Each section can then be examined relatively quickly, by viewing each screen one at a time until each section of imagery has been analysed.
The following graphic illustrates this concept. Notice that coordinates are provided where a single square of imagery can be examined in this fashion, making it easier for you to determine the dimensions of the area based on your own computer's monitor settings.
The key here is to keep an eye out for new areas of high-resolution coverage to examine. When I started my SAM site file, there was very little high-resolution imagery outside of the United States and Western Europe. I kept abreast of imagery updates to Google Earth through the Google Earth Blog, found here. Each time a new area appeared, I went through it to see what I could find.
It should also be noted that "Eye alt" is completely unrelated to the altitude of the terrain found in the lower left corner, denoted by "elev" for elevation. Regardless of the terrain's elevation, your "Eye alt" should be at 15,000 feet. This will give you the same viewpoint at all times. Setting the elevation to 15,000 feet can result in some issues, especially when the terrain is elevated around 5 or 10 thousand feet. You will end up with a much closer viewpoint and have to spend a lot longer examining a given area.
THE HUNT IS ON
Once you have found a pattern for examining an area of imagery, the trick is to find items of interest to tag for identification. There are two ways to do this.
The first method of identifying interesting locations is to simply create a folder and insert a placemark where something of interest may be located. These items can then be revisited later once the area has been thoroughly examined. Close-up inspection will often divulge the identity of the structure or facility.
The second method requires a little more time and patience, and a degree of knowledge. I have been examining SAM sites, for example, for quite some time now. I personally find it easier to immediately identify the sites to save myself the trouble of having to reexamine them and rename the placemarks. Some sites, like those of SA-1 or SA-5 systems, can be readily identified even from 15,000 feet, but others may have to be zoomed in on to clarify their type. The problem here is that you have to be careful when zooming back out to keep your screen centered on the same location it was before you zoomed in. This allows you to avoid skipping something potentially interesting because you reset your screen to a new area when you zoomed back out.
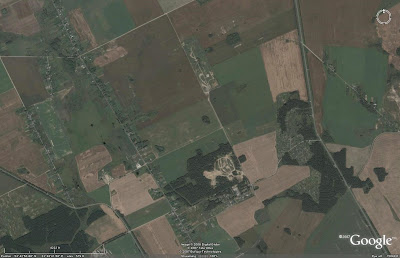
Finding something that looks interesting is a relatively simple task from a 15,000 foot vantage point. Consider the image below. It was screen captured from an altitude of approximately 15,000 feet in Belarus. Residential areas, fields, and forests can be seen, as well as a number of roads. Two facilities in the center of the image stand out immediately. They do so because they are markedly different from their surroundings, seeming "out of place" in a rural area. The northern facility is clearly rectangular and isolated from the surrounding areas, while the southern area has been cleared out from a patch of trees in an interesting pattern. As it turns out, the northern facility houses the 64N6 search radar for the S-300PMU SAM battery in the southern facility.
The simple rule here is to merely see if anything catches your eye. You may end up locating a power plant or a factory, but this can be determined later when you closely examine your finds. With a little bit of experience you will gain a feel for the types of sites and objects that you are looking for and will be able to pick them out of their surroundings with greater ease.
IDENTIFYING OBJECTS
Locating something is only half of the equation. The next step is to identify what you are looking at. There are many ways to do this.
First, the simplest method of identifying something is to see if someone else has done the work for you! In the layers tab of Google Earth, expand the "Gallery" menu and click on the "Google Earth Community" box. This will insert any placemarks that Google Earth users have uploaded into the server. If your location has already been examined, chances are it has a placemark attached to it, which you can then view in Google Earth, and copy into your own file if you desire. This does have an advantage, as you then have a baseline for comparing other items you find if a like item has already been marked. Do take note that the accuracy of placemarks in Google Earth is not guaranteed, however.
The alternative is to identify the locations yourself. This can be a very time consuming endeavor. To be frank, in order to do this effectively, it does help a great deal to have some knowledge about what you are trying to identify. This knowledge can come from personal experience, or from external sources. If you are trying to identify a SAM system, for example, a publication such as Jane's Land Based Air Defence can be of great value. While Jane's does not provide any detail regarding site layouts, it does provide you with some useful information. There are pictures of most of the relevant equipment, for example. It takes a bit of thought to equate a side-on photograph to a piece of top-down imagery, but it can be done. The dimensions provided are very valuable, as they give you a yardstick to compare your finding to. If you are examining a SAM site, for example, and you have determined that the launch rails should be 30 feet long, any potential matches can be measured in Google Earth using the ruler tool found at the top of the screen (do take care to chage the unit of measurement to whatever you have found; if you have been given a length in meters, for example, make sure you aren't measuring in feet!). If you find a number of objects that are 20 feet long, then you are obviously not looking at that particular SAM system. Jane's also provides a list of users for each SAM system. A list of nations associated with what it is you are hunting for can save you a lot of time. For example, according to Jane's the nation of Brazil has no SAM systems identifiable in Google Earth imagery (i.e. large, static SAM sites, not man-portable units or those mounted on small, unidentifable vehicles). That saved me from having to take the time out to examine all of the imagery in Brazil. Organizing your search in a fashion similar to this will make it a lot easier as you won't get frustrated searching for and not finding things in places that they have no business being in the first place!
To be blunt, successfully identifying objects will take some practice, but once you have become proficient it is a much smoother process. It all boils down to the amount of effort you put into the process.
OTHER TRICKS
There are some other tricks to identifying objects in Google Earth.
If you are looking for facilities in a given area, you might do well to locate a map with the facilities marked. Maps can be inserted into Google Earth as Overlays. Overlays place objects such as photographs or maps over the visible imagery. Their transparency can be adjusted so that you can view the imagery through the map. Overlays can be tricky to insert. You have to be careful to match the map to the imagery, and that can take some time to get right. Otherwise, the locations on the map will not match up with the imagery, and the map will be of no help whatsoever.
I used an overlay map to aid in identifying the inner and outer SA-1 SAM rings around Moscow. To do this, I located a map of the SA-1 locations in the CIA's FOIA archives available on the web. The map can be seen below:
Once I had matched the map up with the imagery, I simply adjusted the transparency factor and browsed the area. Fortunately, SA-1 sites are enormous and were easily identifiable even in low-resolution areas, and I had all of them mapped out in short order.
Another technique is to locate an external source of locations far less irritating than something requiring the creation of an overlay. One fine example is Google Earth user LeX2's website depicting SA-5 SAM sites, found here. By zooming in on his map, I was able to then extrapolate the locations of the facilities by searching the same areas in Google Earth. At one point, we had both been identifying SAM sites for a while, and as he had concentrated on SA-5 sites, he inquired about incorporating his sites into my SAM catalog. I enthusiastically agreed, as it would save me the time of finding them myself, and he had located numerous sites in low resolution areas that I would normally not have concentrated on anyway.
This brings us to the third trick, the Google Earth Community, found here. By joining the community, you can post findings on the forum which will eventually be entered into the server to be viewed by everyone in Google Earth. The benefits of this community are sections dedicated for like-minded individuals, such as those of us who primarily hunt down military objects. There is a substantial knowledge base there, and chances are that someone will be able to help you identify something that has you stumped. My SAM site project began at the community as a file containing the aforementioned SA-1 rings, and through the interaction with and encouragement from users there has evolved into the 1400+ site database that it is today.
CONCLUSION
To sum up, the steps for successfully browsing and identifying objects are as follows: set your viewing altitude to 15,000 feet, break the area up into portions denoted by the area encapsulated by the viewing area on your screen, and move piece by piece through a given piece of imagery, marking down the locations of interesting items as you progress. Who knows what you may find! Keep in mind that this is can be very time consuming, however, and may end up with you creating your own blog!
SOURCES
-Satellite imagery of Belarus provided courtesy of Google Earth.
I am often asked about the time and effort it takes to peruse through Google Earth's high resolution imagery to locate various items, most often SAM sites, of which I have catalogued over 1400. Locating military installations and other interesting objects can be a time consuming endeavor, but it can be made far easier with a few simple techniques. In this article I will share some of those techniques which have served me well in the past, with the hope that your experience viewing imagery through such sources as Google Earth will be that much more enjoyable and interesting.
COMPUTER SETTINGS
To begin, we will exmamine some of the basic computer settings that are helpful in examining imagery. My monitor is a widescreen display with a resolution of 1920 x 1200 pixels. Setting your screen to the maximum resolution is helpful when viewing imagery sources as it aids in bringing out some of the fine detail that can be seen. Inside the Google Earth options menu, set the Detail Area to the maximum setting of 1024 x 1024. Even with a widescreen monitor, with the Placemark and Layer tabs expanded on the left of the screen the entire imagery display will then display eitirely in full detail, without any of the areas surrounding the very center of the image being blurred. This will greatly aid in examining what you see before you on your monitor.
BEGINNING EXAMINATION
In the bottom right of the imagery display area in Google Earth, you will notice a label called "Eye alt", followed by a series of numbers and an abbreviation. What these numbers are telling you is the alttude, in either feet or miles, that you are viewing the image from. I have found that the optimal viewing altitude for quick perusal of a given area is 15,000 feet.
When imagery is added into Google Earth, it is usually in the form of strips of either satellite or aerial imagery. These strips are in reality collections of square-shaped images that have been combined together into a mosaic. With my monitor settings, each individual square can be broken up into six rows, with each row being approximately three and a half screens across. Each section can then be examined relatively quickly, by viewing each screen one at a time until each section of imagery has been analysed.
The following graphic illustrates this concept. Notice that coordinates are provided where a single square of imagery can be examined in this fashion, making it easier for you to determine the dimensions of the area based on your own computer's monitor settings.

The key here is to keep an eye out for new areas of high-resolution coverage to examine. When I started my SAM site file, there was very little high-resolution imagery outside of the United States and Western Europe. I kept abreast of imagery updates to Google Earth through the Google Earth Blog, found here. Each time a new area appeared, I went through it to see what I could find.
It should also be noted that "Eye alt" is completely unrelated to the altitude of the terrain found in the lower left corner, denoted by "elev" for elevation. Regardless of the terrain's elevation, your "Eye alt" should be at 15,000 feet. This will give you the same viewpoint at all times. Setting the elevation to 15,000 feet can result in some issues, especially when the terrain is elevated around 5 or 10 thousand feet. You will end up with a much closer viewpoint and have to spend a lot longer examining a given area.
THE HUNT IS ON
Once you have found a pattern for examining an area of imagery, the trick is to find items of interest to tag for identification. There are two ways to do this.
The first method of identifying interesting locations is to simply create a folder and insert a placemark where something of interest may be located. These items can then be revisited later once the area has been thoroughly examined. Close-up inspection will often divulge the identity of the structure or facility.
The second method requires a little more time and patience, and a degree of knowledge. I have been examining SAM sites, for example, for quite some time now. I personally find it easier to immediately identify the sites to save myself the trouble of having to reexamine them and rename the placemarks. Some sites, like those of SA-1 or SA-5 systems, can be readily identified even from 15,000 feet, but others may have to be zoomed in on to clarify their type. The problem here is that you have to be careful when zooming back out to keep your screen centered on the same location it was before you zoomed in. This allows you to avoid skipping something potentially interesting because you reset your screen to a new area when you zoomed back out.
Finding something that looks interesting is a relatively simple task from a 15,000 foot vantage point. Consider the image below. It was screen captured from an altitude of approximately 15,000 feet in Belarus. Residential areas, fields, and forests can be seen, as well as a number of roads. Two facilities in the center of the image stand out immediately. They do so because they are markedly different from their surroundings, seeming "out of place" in a rural area. The northern facility is clearly rectangular and isolated from the surrounding areas, while the southern area has been cleared out from a patch of trees in an interesting pattern. As it turns out, the northern facility houses the 64N6 search radar for the S-300PMU SAM battery in the southern facility.

The simple rule here is to merely see if anything catches your eye. You may end up locating a power plant or a factory, but this can be determined later when you closely examine your finds. With a little bit of experience you will gain a feel for the types of sites and objects that you are looking for and will be able to pick them out of their surroundings with greater ease.
IDENTIFYING OBJECTS
Locating something is only half of the equation. The next step is to identify what you are looking at. There are many ways to do this.
First, the simplest method of identifying something is to see if someone else has done the work for you! In the layers tab of Google Earth, expand the "Gallery" menu and click on the "Google Earth Community" box. This will insert any placemarks that Google Earth users have uploaded into the server. If your location has already been examined, chances are it has a placemark attached to it, which you can then view in Google Earth, and copy into your own file if you desire. This does have an advantage, as you then have a baseline for comparing other items you find if a like item has already been marked. Do take note that the accuracy of placemarks in Google Earth is not guaranteed, however.
The alternative is to identify the locations yourself. This can be a very time consuming endeavor. To be frank, in order to do this effectively, it does help a great deal to have some knowledge about what you are trying to identify. This knowledge can come from personal experience, or from external sources. If you are trying to identify a SAM system, for example, a publication such as Jane's Land Based Air Defence can be of great value. While Jane's does not provide any detail regarding site layouts, it does provide you with some useful information. There are pictures of most of the relevant equipment, for example. It takes a bit of thought to equate a side-on photograph to a piece of top-down imagery, but it can be done. The dimensions provided are very valuable, as they give you a yardstick to compare your finding to. If you are examining a SAM site, for example, and you have determined that the launch rails should be 30 feet long, any potential matches can be measured in Google Earth using the ruler tool found at the top of the screen (do take care to chage the unit of measurement to whatever you have found; if you have been given a length in meters, for example, make sure you aren't measuring in feet!). If you find a number of objects that are 20 feet long, then you are obviously not looking at that particular SAM system. Jane's also provides a list of users for each SAM system. A list of nations associated with what it is you are hunting for can save you a lot of time. For example, according to Jane's the nation of Brazil has no SAM systems identifiable in Google Earth imagery (i.e. large, static SAM sites, not man-portable units or those mounted on small, unidentifable vehicles). That saved me from having to take the time out to examine all of the imagery in Brazil. Organizing your search in a fashion similar to this will make it a lot easier as you won't get frustrated searching for and not finding things in places that they have no business being in the first place!
To be blunt, successfully identifying objects will take some practice, but once you have become proficient it is a much smoother process. It all boils down to the amount of effort you put into the process.
OTHER TRICKS
There are some other tricks to identifying objects in Google Earth.
If you are looking for facilities in a given area, you might do well to locate a map with the facilities marked. Maps can be inserted into Google Earth as Overlays. Overlays place objects such as photographs or maps over the visible imagery. Their transparency can be adjusted so that you can view the imagery through the map. Overlays can be tricky to insert. You have to be careful to match the map to the imagery, and that can take some time to get right. Otherwise, the locations on the map will not match up with the imagery, and the map will be of no help whatsoever.
I used an overlay map to aid in identifying the inner and outer SA-1 SAM rings around Moscow. To do this, I located a map of the SA-1 locations in the CIA's FOIA archives available on the web. The map can be seen below:

Once I had matched the map up with the imagery, I simply adjusted the transparency factor and browsed the area. Fortunately, SA-1 sites are enormous and were easily identifiable even in low-resolution areas, and I had all of them mapped out in short order.
Another technique is to locate an external source of locations far less irritating than something requiring the creation of an overlay. One fine example is Google Earth user LeX2's website depicting SA-5 SAM sites, found here. By zooming in on his map, I was able to then extrapolate the locations of the facilities by searching the same areas in Google Earth. At one point, we had both been identifying SAM sites for a while, and as he had concentrated on SA-5 sites, he inquired about incorporating his sites into my SAM catalog. I enthusiastically agreed, as it would save me the time of finding them myself, and he had located numerous sites in low resolution areas that I would normally not have concentrated on anyway.
This brings us to the third trick, the Google Earth Community, found here. By joining the community, you can post findings on the forum which will eventually be entered into the server to be viewed by everyone in Google Earth. The benefits of this community are sections dedicated for like-minded individuals, such as those of us who primarily hunt down military objects. There is a substantial knowledge base there, and chances are that someone will be able to help you identify something that has you stumped. My SAM site project began at the community as a file containing the aforementioned SA-1 rings, and through the interaction with and encouragement from users there has evolved into the 1400+ site database that it is today.
CONCLUSION
To sum up, the steps for successfully browsing and identifying objects are as follows: set your viewing altitude to 15,000 feet, break the area up into portions denoted by the area encapsulated by the viewing area on your screen, and move piece by piece through a given piece of imagery, marking down the locations of interesting items as you progress. Who knows what you may find! Keep in mind that this is can be very time consuming, however, and may end up with you creating your own blog!
SOURCES
-Satellite imagery of Belarus provided courtesy of Google Earth.

3 comments:
What about areas which don't have high-res, publicly available? Specifically I am interested in rural vermont, but most of it is older USGS aerial imagery. The resolution on Terra Server was better than what's on Google Earth now, I remember crisp B&W images and now it's in color but much less clear.
Great article! Very helpful!
The Red Son:
You can always purchase imagery yourself from a provider such as Digital Globe. A lot of the Google Earth imagery is uploaded from Digital Globe sources, but the problem is that it is not always current. Their aim is to attempt to cover as much of the world in high resolution as possible and not concentrate on continuously updating the entire database just yet.
Whereabouts in Vermont are you searching for? I have a few different imagery sources that I use, one of them might offer a better, more current view of the area in question.
Post a Comment